News - Fast & Easy Tier 3 Rare Schematics Farming Guide (how To Get Rare Schematics - Warzone 2 Zombies Red Zone)

Here, it's relatively easy, but they have added some zombie spawns now, so depending on how much damage the vehicle is taking as you do this, you may actually want to avoid running over those zombies just because it's extra vehicle damage that is relatively. Easy to dodge now at the very end of the route here you obviously have to drop the cargo to the helicopter, and there's usually a big swarm of zombies that you have to drive through, drive straight on through them even if it's going to destroy the vehicle cuz you need those zombies need to be dead and when the contract ends and you've successfully, completed it should kill most zombies in the immediate area when it spawns in that rewards Rift but if there are still some stragglers you can stun them with the grenade launcher, as you loot you can also optionally throw a decoy here if you still have one and your dog should help you take down those last couple of zombies, as well so you've done a contract and you've got some loot but now we need to rinse and repeat the first thing you're going to do is head up to this Courtyard, here and grab the ammo cache to refresh your ammo and also crucially.

But we might as well do the contracts if we have an easy method to do them, and so I'm going to run through some tips on how you can do weapon stashes, spot controls, outlast, and all sorts of bits and pieces here while you're waiting for your deliver cargo to become available, but the priority at all times should be deliver cargo because it's so damn fast, and this is also, by the way, why I told you to just cancel ACV and escorts whenever you see them because they're the hardest this contract in tier three, and so we're never going to bother doing them; it's just not worth the hassle, so for weapon stashes.
I'd say it's possible to do this without, a turret circuit, but if you've got a turret circuit it makes your life crazy easy you're going to start the contract drilling the safe and then mantle up or climb up these piles of boxes at this kind of jump up balcony area and get ready to jump out of the window this will give you a second in the courtyard, where you can deposit the circuit into the turret if you've got one and then you can stay in the vicinity of the turret and just run in circles like I do here and allow the turret to do absolutely all the work for you or you can Smo your way back inside next to the safe and once again climb up the boxes, and when you're standing on that balcony, throw a decoy.

Away from the jump up so that all the zombies in the area path towards that instead use both your decoys here being wary of the fact that zombies now spawn and run through the window sometimes so you need to watch out for those when you're on the balcony and remember you have an rgl that's crazy useful for stunning zombies so you use that to your advantage too pretty much anytime in this article honestly that I say use a decoy, you can use the rgl for the same purpose and that's why we brought it along as our insurance weapon so keep on stunning zombies that come your way or distracting them with decoys and then hop out of the window like before run over to the ammo cach refresh your decoys.

And repeat running away from the zombies and using throwing knives where necessary, and then clambering up onto that balcony and using decoys to keep the zombies at Bay but obviously this is significantly easier with a Turret so don't be precious about it use the turret circuit if you've got one now if you're set on doing it without a circuit I'd also say that a trick that you can use here to make it a bit easier is to stash decoys in your inventory, instead of equipping them before refreshing your ammo cache just so that you're running around with like four decoys instead of two and that means that if you're in a pinch you'll still have some backup ones that you can use if you need to wait an extra 18 seconds or something for your ammo cache to get off coold down next up is the Spore control, contract, this is a lot easier with a larger backpack because it will allow you to Stone.

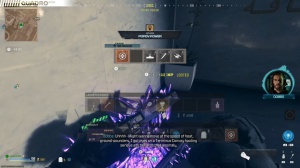
The Inhibitors those are the special equipments that you need to throw for this contract but when you go to pick them up it's essential, that you Stow your decoys, instead of replacing them and dropping the decoys on the floor because otherwise you won't be able to refill decoys At Ammo caches in the future in your match or at least you won't be able to until you find new decoys, so grab as many stacks of Inhibitors as you can carry without losing your decoys and then run as fast as you can to each Spore and throw the Inhibitors down without destroying the spores straight away just throwing the Inhibitors then as soon as you have a chance to breathe equip the next stack of Inhibitors and repeat the process until all Inhibitors are on the ground and all spores have become vulnerable you can then take out the spores crazy easily with the rgl, from pretty much any range and that will complete the contract next up is the Outlast, contract for this location.

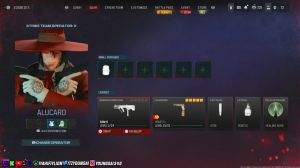
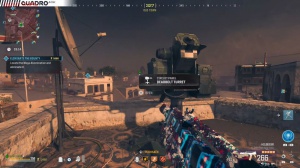
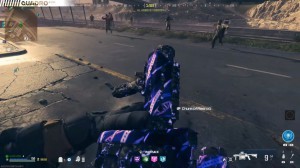
I ran in a circle around the interior area, and I basically kept shooting zombies with the rgl to knock them down now my objective here my real goal is not to kill every single zombie in sight if there's maybe a dog in sight that is on my tails and is really biting at my heels then yeah maybe I do want to take that down and you could use the rgl or you could use a throwing knife on it as well throwing knife obviously being very powerful here but overall the rest of your focus really is just stunning them with the rgl now if you want to, you could use a Sentry turret to disrupt the hord a little bit here like I'm doing in the game playay but to be honest you just don't need to and as long as you're really careful and keeping your wits about you for dogs and super sprinters you should be able to play, essentially a game of cat and mouse with this and still complete the Outlast next up is Bounty contracts, now these I simply would not do if you don't have a turret circuit a Sentry turret or a jug suit one of those is going to be Essentials.
The good thing is that you get jug suits, for example, as rewards from other Tier 3 contracts, so it might be that you choose to prioritize Spore Control when you don't have the rewards, and then when you do have a couple rewards stored up, that's when you decide to do something like this. So let's say you activate the Bounty, and it gives you a disciple, a mangler, or a mimic.

Killing one of those with a jug suit is pretty straightforward. But be careful if you've got a mega-abomination as your target, as there's a good chance that you won't entirely kill it with just one suit. That's why I'd say that having a Sentry turret in your back pocket could also be handy, because that could help finish off the mega Abomination just the last little bit that you need to do, or if it is a mega Abomination, you could choose not to use the Jug suit instead.