News - The Secret To Winning Hardpoint Invasion On Warzone 2 Ranked Play

We're looking at the best holds you can have on hardpoint, and today we're kicking it off with invasion. I've never done this before on any of my Call of Duty games, so if there's any sort of positive criticism you can give me to make this better for you guys, that's more helpful. Obviously, this is going to increase your chances of winning.

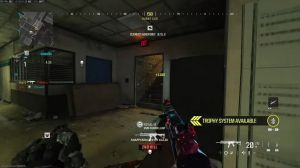
And it's not going to be perfect; you still have to win your gunfights, but this just gives you the best ability to hold spawns properly and win your gunfights. Now, this isn't a spawn guide article. I'm not going to get into too much depth of what the spawns are and obviously I'm going to touch on how to block it because that helps that's part of position him but generally speaking this isn't a spawn guard article if you want to check that out feel free to do so today we're looking at P1 here on invasion, you can see , this yellow zone is the hard point, and we are going to be a blue team here so first off you've got this guy at the top he's on P2 tank and he's watching the street and the reason he's watching the street is P2 is over this area here so he's just making sure these guys can't rotate, to this side of the map because realistically as soon as these guys get to the side of the map it gives opens up the spawns on the other side for you to flip which you sort of don't want to do at this point.
Then also have a guy on the middle tank who's watching over the player on Hill who's number seven; he should be using an as should the guy on the tank, and he's sort of slicking between watching a street and looking over Hill so realistically, he can stay down on the tank until, like you know, he feels like there's someone being contested, but number seven is the first guy who should have a sub on the hill, and he's literally just holding a corner, holding an angle, and waiting for a push.
Now number eight over here is holding Cafe, the old P1 here; it's his job as a sub to be running around this area here, making sure this guy number seven can't get flanked through his Cafe era. It's a very popular spot to sit and push through. Sorry if you're the red team, so this is the best way to do that.

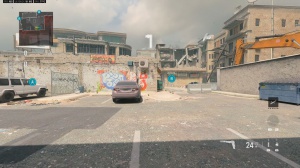
Now obviously, when you get over towards P2, you sort of don't want to pull back a little bit, so moving on to P2 here, you can see that these blue tides you sort of want these back SPS here, so moving back to where we were, you sort of say you get four down and you don't really want to push back and rotate to Palace.
You sort of want to keep these spawns on this side of the map instead of here because Palace gives you crap spawns for the next couple of hills. So moving it here, you realistically want three ARS on this hill. Number eight can also watch Long Street, but he should be able to see anyone you know cross into that from this POV.

Number six has to maintain the tank controls, so all he has to do, literally, when these guys start to flip to Callus, is sit on the tank on the other side and look over, and he's watching this main long area here now. This is where the main source of infiltration is going to come from. This guy number eight just can't die; he's got to have a trophy on his feet and ask for help if need be, so number five is also watching this cross as his number seven; he's playing as an SMG; he can watch this close cross as a sub and win his gunfights here, so this is probably the only sub you need on this hill.
Push up a little bit further and twice scream just to cut off the flank if, in case you know, cut off the pinch if anyone else decides to push this side here. Now let's say, for example. There's a lot of pressure on the middle side of the map here, and number eight needs help. Now number six can come off the tank, come through mid-cur or dark, and help watch the cross, and this is a nice little spot.
He can go from here back to where he was in like 5 seconds or so—not even 5 seconds to be fair—and he can just benefit both pushes here. So if number eight is communicating the fact that he's struggling, they're struggling, sorry, and they need help towards Middle Park, then number six can do that, and then go back to here because these two have literally got this one area they need to watch, so it should be perfectly doable.

Now when you pop to P3, you want to maintain the side of the spawns realistically. This is the best and easiest way to hold this spawn now. This is one setup I like to have if you're playing people who aren't necessarily amazing at the game, because if you guys have seen the spawn guards break this hill, you want to rotate all the way around to the left and get the SP.
You know, push out the spawn through here. It takes maybe 15 seconds, but it can win you the spawn for the next three potential maps. Obviously, the P4 is a little bit Wicky Wacky, sorry, so on this setup, number five is literally just watching his close; he's not dying; he's staying down on the hill, and he's got a sub.
Number seven also has a sub; he's playing inside Cafe; he's making sure that people can't sort of flank the midside here so that number eight dies, and then number eight and. Number six, sorry, number eight, and number six are watching the line because this is where 90% of the time they're going to be coming from.

You might get a roog guide try and flank, but hopefully number seven should be able to point out, especially if he closes the doors, he can sound hall that, and then he can just look out the windows here and just see if anyone crosses, so number seven is in charge of holding this area up. By the way, these setups are ones I actually practice in game, so I play like an XP league in rank play.

When I'm playing with my squad, who know what they're doing, these are very similar to the sets we do have, and they work; we win; we win a fair amount now. If the team we're playing against is a decent team and they decide they want to put a little bit more pressure towards this upside of the map here because realistically they want these back spawns, then this is an alternative set up you can have so you still got the number eight here watching the long line of sight and realistically, he can Peak without getting shot and getting a lot of info so this is where he's going to come into handy here he wants to stay alive because he is blocking this spawn back here he if this guy died it opens up the spawn back gas for red to spawn there so this guy needs to put a trophy down at his feet use an AR and just play his life he can be paying for info if he doesn't want to commit to a chow, number five is still doing the same thing literally just watching a close angle with a sub number six is almost doing the same thing.