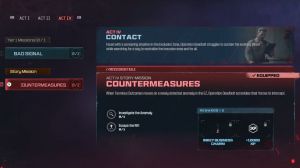
News - Easy Tier 1 Bad Signal Story Mission Completion For Act 4. Call Of Duty Warzone 2 Zombies

Then in terms of like you don't have to worry about taking too many plates in with you as you go into the dark ether since the sort of prep in the encounters, up until the worm you can actually kill a lot of zombies and you can get a lot of plates so you can actually stock up during this time make sure to grab some Sal self revives you have the one that you carry on you and then obviously get yourself a couple of additional ones I would say another two at least if you have three self- revives that is essentially four attempts that you get before you lose out so the more self revives means the more times you can up and you can survive, now the other things that here that I'm going to mention is not necessarily.

Absolutely required, but they are going to make your life a lot easier. When it comes to drinks, Speed Cola is really good. Juggernog is really good, and Deadshot D is really good. Stam up and Quick Revive can also help you since you know quick revive is just going to help you regen your life faster and Stam up is going to give you that little bit of faster run speed, but Speed Cola Juggernog and Deadshot daker I think is really good if you can focus on those three to bring them in then you're good to go in terms of your weapon mod brain rot is from a utility perspective really good because it can actually you shoot some zombies and they'll just essentially turn on your side and then run around and distract the enemies away from you which is basically what you want, and shatter blast is also really good because it's just a great way for you to chunk damage onto enemies and it actually gives you quite a little bit of a DPS increase there, then the other two the last two things that I promise I'm almost done with the prep, is that you can also consider to bring some sentries in with you of course if you have a juggernaut.

Kit that can also help, but sentries are really good because you can use them to sort of deny the area around the worm and kill a lot of zombies that are coming towards you from there, plus the sentries actually shoot at the worm, which is fantastic. And every once in a while you will luck out and you will find the map that actually has a dead ball turret, right next to the beach that you fight the worm on and it's for this reason that I would advise you to bring at least one or two dead bolt turret kits with you as well, that means that if you lock out and you find this map you can slap that in there that dead bolt turret is also just going to put in some serious work for you but don't fear if you don't find any of these to bring in and of course you could also have a situation where the dead ballar doesn't spawn on the beach so then you kind of just throw the away at the beginning as you launch into the dark ether, in any case okay so now that you have all of that spun up together and you're good to go you're going to head to the area of the map that I mentioned before and you're going to go ahead and activate, this portal over here it's going to ask you to vote to enter even if you're just playing solo so simply pop open your map.
And choose to vote on the computer; it's like M, and then you press three. And that is actually going to load you into the dark ether map. Now, right at the beginning, when you load into this map, you have a little bit of time to breathe because you're not going to be pushed immediately on this bridge where spawn, and those of you that have played DMZ in the past or at the very least have played Modern Warfare 2 War Zone or something like that will recognize.

This is an asset from the AL Mazra map. This is, of course, the Albra Fortress, which sits to the south of the map, and knowing the layout of that kind of thing helps you a lot to navigate this area already, but for the sake of this guide. I'm going to act as if you have no idea what I just said, and so therefore.
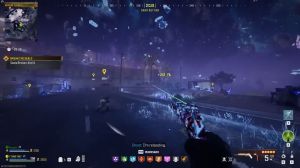
I'm going to show you this map that you're looking at here right now just to help you look at yourself a little bit. The point is that at the very beginning, when we spawn here, we have four objectives. To us, we have to essentially go to four different areas and then activate a pillar and then hold out the area while killing enemies in the sort of circle that forms underneath the pillar, and that will absorb the souls, or whatever you want to call it, the dead zombies, and that will cause the pillar to explode.

And then you have essentially cleansed that area again. As mentioned, looking at the map here, you have four this is it one, two, three, and four. The order in which I do this usually when I do this mission is that I go straight down the middle here and I do the first one here, coincidentally. This is also the most difficult one of the four then you go over to the right side here and that's your second one that you do then you go to the middle of the Fortress over here that's the third one and then you go all the way over to the left side and that is the final one of the four now once you have done all four of these then you're going to essentially get the Waypoint to go to the South and then we're going to have the boss encounter, but walking us through each one of these the first one as mentioned is up here on this parking area, the circle for this is actually relatively small so what you want to do is you just want to move into the area and you can preempt this by dropping a you know energy mine over there and essentially using that as cover, to basically you know activate the portal or the pillar and then essentially just dance around it and use your weapon to knock down the enemies.

Because there's such a huge amount of enemies that spawn you on this one you should be able to trigger it quite quickly and that is pillar one of four done then you simply ZIP down over the side here you go to this middle area or sort of the middle area of this building here it's on the inside, and at this point in time I also just want to mention the fact that you want to be doing this as fast as possible the enemies inside this area spawn, non-stop in on this map they spawn non-stop so the longer you take to do all of these steps the you know more danger you're going to face so absolutely go as fast as you can don't get bogged down to gunfights that you don't need to take part in and just move for the objectives.
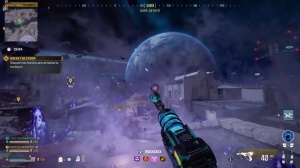
So moving over to this one here you jump down in the middle here you activate it once again you hold out now bear in mind normal zombies are going to come at you you're going to get mimics coming up you there's going to be disciples, sometimes there's a you know sometimes you have manglers there's a ton of that can come at you so stay numble on your feet be loose.

You know, keep your head on a swivel and essentially use your energy mine aggressively to lock down areas, stand in them while they explode, and use that time to plate up and, you know, reload your gun. As soon as you've done the second one, you're ready to move on to the third, for which you can just follow the footage in the background here.