News - Warzone 2 Zombies: Best Solo Rare Classified Schematic Farm
Intro.

In today's article, I am going to show you how to solo the dark ether in both Tier 4 and Tier 5. Before we start the article, I just want to say that the Tier 4 Zone will give you the one-time use cases and the elder signature. This is going to give you access to the Tier 5 Zone, where you can unlock the plans.
I will show you how to do tier four first, and then I will show you how to do tier five. Let's go.
Obtaining sigils.
Number one, I'm making this article with the assumption that you've already finished the ritual with the four sigils; they are all in place, and you have the dark Ether Portal unlocked. Here is just something I wanted to include in the article.
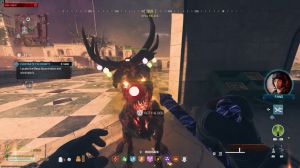
Once you spawn the dark ether, there is going to be a mega-abomination that spawns. You can run away and shoot it off of the little island; it will not attack you. You can go to an ammo cache and finish it off that way. Once you finished killing that Mega Abomination, you should have received a sigil.

This is going to be a regular one. This is going to allow you into Tier 4. You can also get these by completing any Tier 3 contract.
Tier 4.
Now we are going to prepare for the Tier 4 strategy. I would highly recommend having a slight hand juggernog and a PhD flopper. However, the most important piece of the strategy for me was a bunch of armor plates and a bunch of self-revivals in your inventory for Tier 4.
You can have either a purple Tier 3 pack-a-punched weapon or a legendary Tier 2. You won't need it that much—just something to get you out of tough situations. Once you're geared up and ready to go, make your way over to the Ether Rift that you just opened up and initiate the teleport to the dark ether.
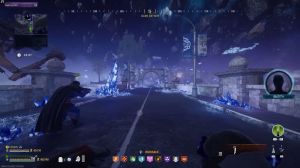
Once you're inside, the timer is going to restart, and you're going to have a full 30 minutes. Follow the exact path that I take, and I will show you the most efficient route you can use. I will also pull up an interactive map at the end of this article just so you can see exactly where everything is in the dark ether.

I will speed up certain portions of the article just to save time, but you should still be able to get an idea of the exact path that I take. Once you climb up this ladder, there is going to be an ether bunny, and this is going to indicate the first of three contracts. The strategy really just requires you to run and be as fast as you possibly can.
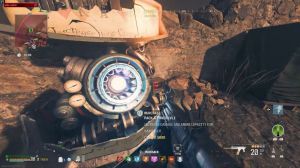
Once you get to the zip line, go ahead and ascend right up it. The second you're at the top, there's going to be the first ether extractor. Here you can either use a Tesla storm field upgrade or you can trigger an ether shroud; this should give you enough time to disable the first one completely.
Make sure to run away right as it does because it's going to explode. From here, just keep following the path that I take. You're going to climb up this ladder, and we're going to keep High Ground the whole way through. Once you make your way over to the second extractor, go ahead and throw a decoy down.

This should give you enough time to disable the second one. Keep in mind that special zombies will not get attracted to the decoy, but it shouldn't matter once you get the second one down. Jump down as fast as you can and follow the exact path that I take to the third one. Once you get to the roof, there is going to be the final extractor, with some zombies around it.
Use your last decoy grenade and overload. The final one: once the contract is over, go to the reward rift and pick up your rewards. Ideally, what you're after is an elder's signature. However, you can get the case item of the Ether Blade, the dog bone, and the golden plate. This is not a permanent unlock, just a one-time use.
Now, from the exact same location where you just finished the contract, you're going to jump down and follow the path that I took to this main road. There is going to be a green bus just at this location with a bunny sitting in the front window. Go ahead and pick it up, and this is the second contract.

Outlast: This one's by far the easiest, in my opinion. Go up this zip line, and once you're inside, follow the path inside the building. Once you're inside, go to the PN D, and if there are zombies around, throw down a decoy; if not, go ahead and activate the p& right away. The strategy for this one is fairly simple; you'll notice that on both sides of this building there are staircases.
You'll want to run up one staircase, go to the middle, and try to stay as long as you can on top while killing a few zombies in your way. The second you feel like you're about to get overran by zombies or you can't handle them, simply jump down, make your way over to the opposite staircases, and repeat the process.
One really useful thing I found out is that using this launcher, you can actually slow down the zombies. They'll just tumble; there's a big blast radius, and it won't kill them, but it's going to slow them down enough for you to get away. Also, if at any moment you do go down, don't worry about it.
That's why we have the self-revive It's bound to happen sooner or later. Once the contract is finished, make your way over to the reward rift. In this case, I was able to get my first elder's signature. This is going to give us access to the Tier 5 dark ether. Now there is one final contract, which is the escort mission; however, if you're playing solo, it is nearly impossible.
In the fourth tier of the dark ether, you can get all of the items from the first two contracts; you don't have to do the escort one at all. Once you're ready to get out of this area, make your way to the rooftop, where the final ether extractor is. Was in our first contract. On this rooftop in this corner, you will find the Ether Rift, and you can use this to successfully extract out of the mission. Now, assuming that you've had good luck and you've gotten yourself an elder sigil, I am going to show you how to do Tier 5.
Tier 5.

In the fifth tier of the dark ether This is where you'll be able to unlock the schematics for the permanent items. For this attempt, I tried to do it with as minimalistic an approach as I could.
I only have two perks. Juggernog and Quick Revive I didn't even use a weapon for this run, and I heavily relied on self-revivals and armor plates. Once you're ready, make your way over to the dark Ether Portal, and on the opposite side of it, this is where you're going to use your Elder sigil. Go ahead and initiate teleport.
Once you're inside the Tier 5 dark ether, we are going to be using the exact same strategy that we used in Tier 4; it will be the exact same path. It is basically trying to avoid as much damage as possible, and I must say one thing: the difficulty difference from Tier 4 to Tier 5 is drastic. You'll notice that there are a lot more zombies; they are much quicker; and there are a ton of Mega Abominations.