News - Fix: Cod Warzone 2. 0 / Modern Warfare 2 Won't Launch & Crashing. 100% Working Methods
Intro

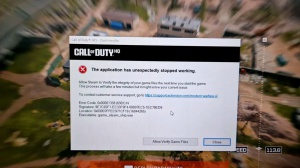
Hi and welcome to another Warzone 2.0 article. Recently, we have had a lot of bad things going on with this game, like crashes, not launching, and black screens. 13 or some other number of files failed to verify the GPU, driver version error, and so on. You can check my channel for fixes for all these errors, but in today's article I will show you how to fix your Warzone 2.0 crashes when you are in the middle of the game or when you press alt tab and it goes black screen or crashes, and if your Warzone won't even launch.
I will cover these fixes for both platforms. Steam and Battlenet. I had Warzone on Steam, but I just installed it on {67} for you guys so I can cover you all, okay?
Steam method
First, I will show you what to do if you play Warzone on Steam. Open up Steam, go to your library, find Modern Warfare 2, right-click on it, select properties, then click on local files.
Here, you will select this option: "Verify Integrity of Game Files." Do not run away now and say, "I have done this, and it didn't work." This is just to make sure that you did this and tried to launch the game because some people claim that this fixed their crashes, but on the other hand, this option is actually here to fix your game; it's scanned for any missing or corrupted files and will replace them with original ones if it finds any of those kinds of files.
So just be patient and wait for this scan to finish if you don't get any error messages here after the scan. launch Warzone and see if it works if you got any kind of error messages here and lately you have 99 to get error messages saying 13 files, 18 files, or 45 files. Then you will proceed to the next step,.
Warzone 20 folder

Click up here on Browse and close this window; this will open the Warzone installation folder. Click up here on Common, and here are your Steam games installed together with Call of Duty. Right-click on the empty spot, select "New," and then "Folder." Name it as you wish; I will call it Warzone 2.0.
Now right-click on this original Call of Duty HQ folder and select "cut." Open this new folder we just created. Right-click and select "paste." If you go back, you will see that we don't have that Call of Duty HQ folder anymore because we transferred it to this folder.
Uninstall modern warfare 2
Close this for now and go back to Steam.

Right-click on Modern Warfare, select "Manage," and then "Uninstall" and "Confirm Uninstall." Do not worry about this, especially if you have slow internet. You won't have to download the whole game all over again. Now you will click on "install" and select that drive where the game was installed before mine was on "G drive," so I will select it and click "next." Steam will now create local files for this game and try to discover existing files; if it does not find any, it will start to download the game.
Click on "Pause," right-click on "Game," select "Manage," and again select "Uninstall," confirming the uninstall. You can minimize steam. open your Windows Explorer and go into that drive where you selected the game to install; mine was G drive; then open Steam Library, steam apps, and then comment; and as you see, steam created a new Call of Duty HQ folder when we were reinstalling the game moments before, so now you will open that folder you created; mine was Warzone 2.0; and open this Call of Duty HQ folder.
You need to copy all these files inside this folder to do it on Quick Way. Hold Ctrl on your keyboard and press A; this will select all files, and now right-click on any of the files and select "cut." Go back to the Common folder, open this Call of Duty HQ folder, right-click and select paste, and wait for all files to be transferred. After the transfer is done, go back and right-click on the folder we created and select "Delete." You can now close this and go back to Steam.
Reinstall steam

You will select the game and press Install again. Select that same drive and click next. As you can see, Steam is again creating game files and discovering existing files, but now it will actually discover the files we just copied.
You have seen how many files were there, so it will take some time for Steam to discover them all.
Test
After it finishes, your game is ready to play, and in 99 percent of the cases, the game will work. Now go launch it and try it; that was the method for all of you playing Warzone over Steam. It took much more time to create this article for you, so please like it and subscribe if you aren't already for more articles like this on , and now let's go to the Battlenet launcher.
Battlenet launcher
If you play Warzone over Battlenet, this whole process will be just a little bit easier for you. In the Battlenet launcher, select Warzone 2.0. Click on this cog icon and select "Show in Explorer." This will open the Warzone installation folder, Open the retail folder and find this exe file. Right-click on it and select properties, up here.
Select the compatibility tab, check the box next to "disable full screen optimizations," and also run this program as an administrator. Now click on "Change High DPI Settings." Check this box here and leave it. I signed into Windows, checked this box, selected the application, clicked OK, and to save all the settings we just made.
I clicked Apply. Apply, and then OK, launch Warzone, and see how it works.
Scan fix

This setting should help you if you encounter a black screen or your game crashes after alt-tapping from the game while in full-screen mode. Next, what you will do is click on this Cog icon and select scan and repair just to make sure that there are no missing or corrupted files while we take the next step.

After the scan finishes, launch the game. If it still crashes, you will perform Next Step by clicking on the Cog icon and selecting "Show in Explorer." As you see here, we are in this Call of Duty folder, click one folder back for me it is this custom folder I made for you it may be directly your drive just select this whatever you have and you will see this Call of Duty folder inside, click on it and select rename, click at the end add space and write Warzone or whatever you want we just need to rename it you can close this for now and go back to Battlenet launcher, if you see install here then you are good; if not, close the launcher; then launch it again and now it will say "install." But you will not click on "install." You will see below install, "locate the game." Click on that option and select Drive, where your game is installed.
For me, it is G Drive. Find the folder you just renamed; mine is here; click on it just once, and down here, click on select folder; you will see it initializing and updating.